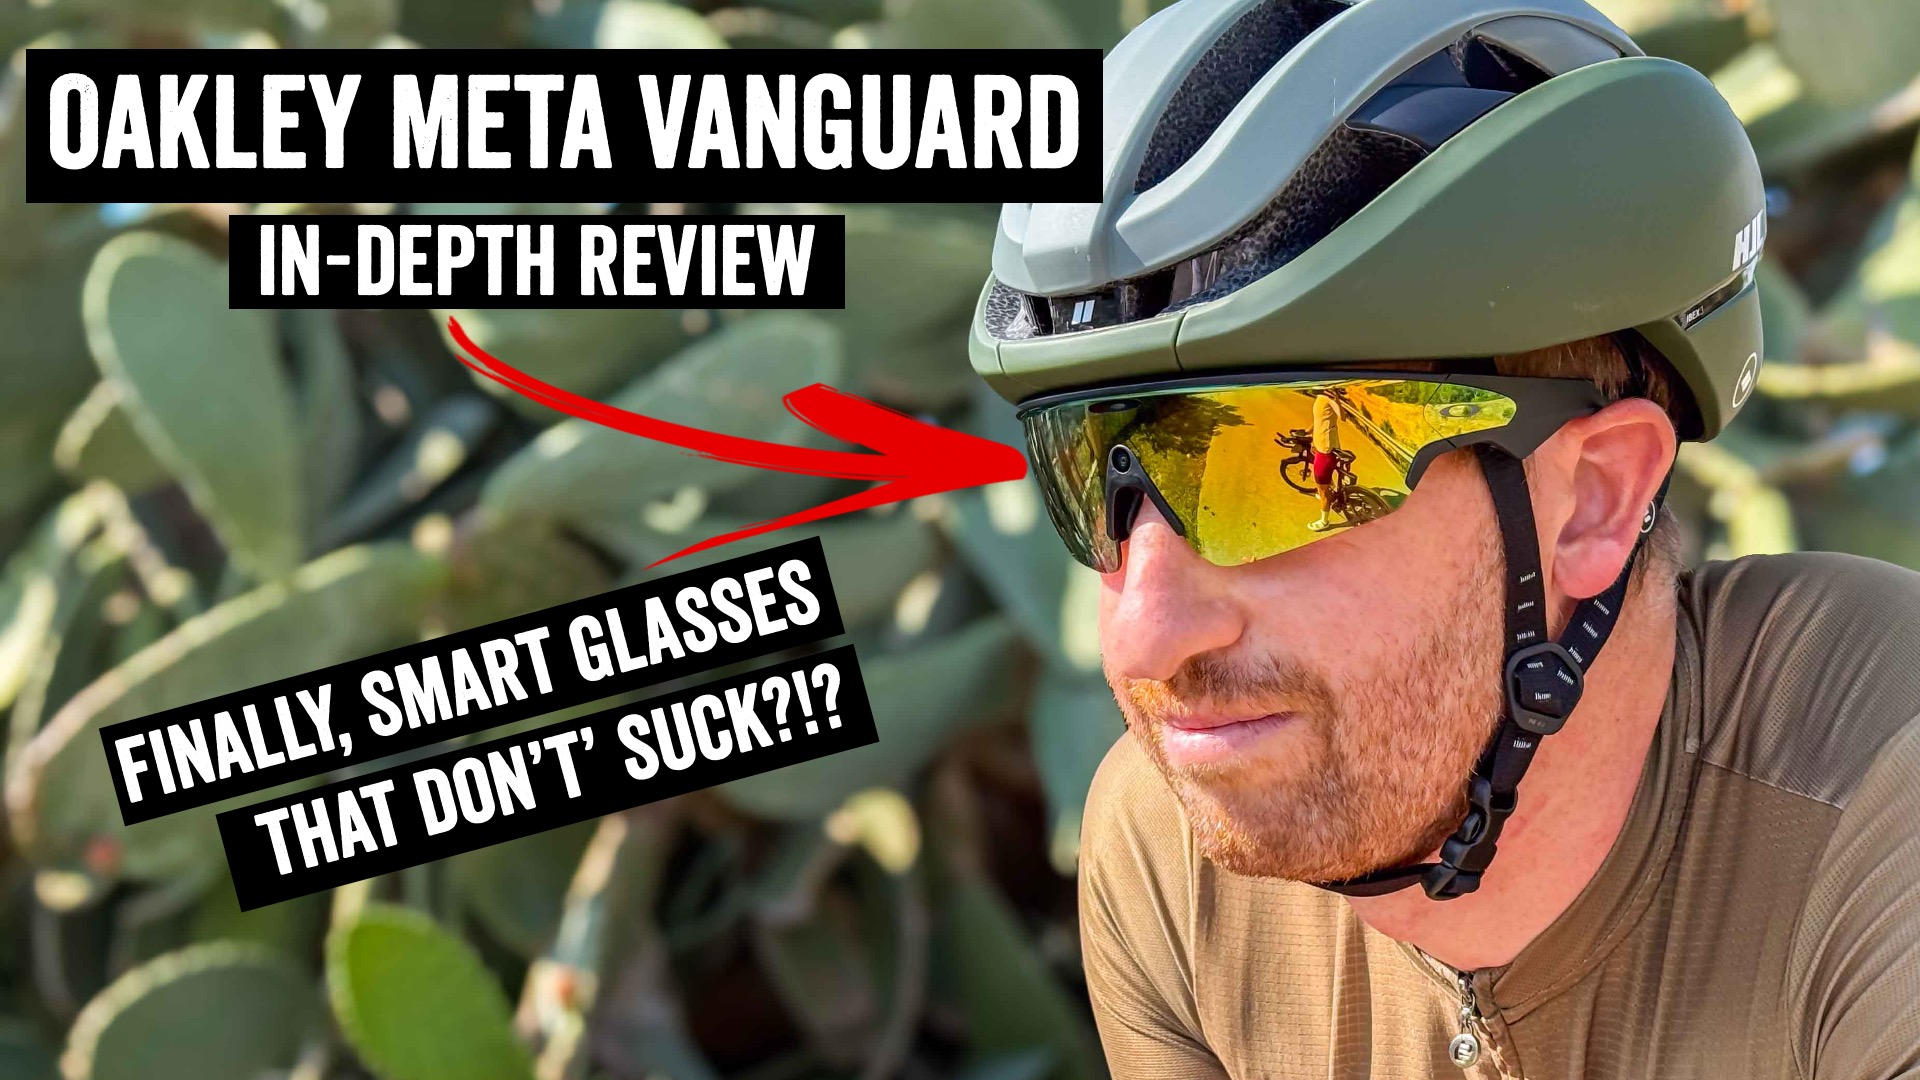
Oakley Meta Vanguard In-Depth Review: We’ve Finally Arrived?
I test a lot of devices. Most of them, are frankly, kinda forgettable. Not that there’s anything wrong with them, they’re great. But they aren’t game-changers in my workflow or sports life. Instead, they are typically an iteration of an existing item I have. One watch for a newer watch. A new trainer for an older trainer. Or a slightly tweaked action cam replacing a newer one.
So when I first heard about the Oakley/Meta Vanguards, frankly, I figured it was going to be yet another smart glasses product that’ll end up in the bin of blah. I’ve tried countless ones over the years, from Recon Snow (2012+), Recon Jet (2013+), Google Glass (2014), Recon Jet (2013+), Garmin Varia Vision (2016), to the SOLOS glasses (2018), Everysight Raptor (2018), FORM Swim Goggles (2019+), and many more I never got to writing about. And that ignores products like the Apple Vision Pro (2024), and making that work in sports too.
When it came to the Oakley Meta Vanguard glasses, I was wrong.
These are astoundingly good. They will absolutely replace a GoPro in a lot of cycling and even running action cam scenarios. But it’s more interesting to understand *why* and *how* they will do that. And beyond that, all the things that annoy me about them. Because, being (sorta) a 1st gen product, there’s still some quirks.
So, let’s dig into it.
In the Box:

Inside the box things are pretty straightforward. You’ve got packaging that wraps around the sunglass case, and inside the case are the Oakley Vanguards. Below it is a polishing cloth, as well as two extra nose bridges.


The extra nose bridges are for both higher and lower nose bridges, to improve fit.

The case itself acts as both a protective case as well as a charging dock. You cannot charge the glasses without the case, there’s no USB-C port on the classes themselves.

Instead, you’ll find the USB-C port on the underside of the case. Further, the case also acts as a battery bank for the glasses, getting it extra chart on the go.
The Hardware:

The first thing to understand about the Vanguard’s is there is no display inside the glasses. This is a common misconception, given the long history of other smart glasses having displays. But as you’ll see in this review, I’d argue this is a feature, not a gap.
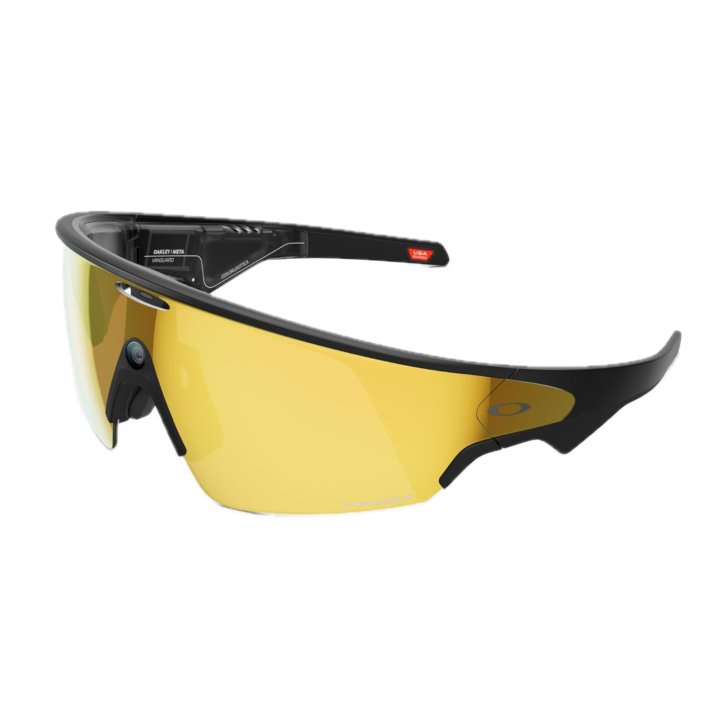
In fact, it’s why I like them so much. They are, in effect, just sunglasses with a camera, speaker, and mic. That’s kinda it. But in the best possible way (well, mostly the best possible way). The weight is 66g, so a bit heavier than traditional sunglasses, but not so much that you really notice it. The charging case is a bit heavier/bulkier, at 258g.

So, looking at things from the right side first, there’s basically three controls here. The first two are the best ones, two physical buttons on the underside. The bigger button is for taking photos, or long-pressing to take a video.

Then, on the side of the glasses there’s a touchpad of sorts.You can tap it once to start paying music, and then swipe forward/back to increase/decrease volume.

You’ll accidentally start playing music countless times when you put on or take off the glasses. Which is made even more fun because there’s about a 1-2 second delay in most cases, so you tap it again thinking it didn’t register, only to have it start playing again (delayed). Rinse, repeat.
Next, there’s speakers on both sides. The speakers are quite loud. I’ve had zero issues hearing music playing while descending at upwards of 60KPH (40MPH). The speakers are not jawbone induction speakers though, so others around you can hear the music, depending on how loud you have it. Meaning, you wouldn’t play the music while sitting on an airplane.

While it’s great the speakers are loud and aren’t actually in your ears, the downside is that it basically blocks all other audio out. I simply could not hear any overtaking cars when music was playing. Perhaps I was rocking out a bit too loud, but even in lesser volume settings, the music totally overpowered any other outside sounds (including my wife at times).
Next’s the mic. Simply put, the microphone (well, five microphones to be precise) is designed to capture your requests, mostly starting with “Hey Meta”, followed by whatever you’re asking for. But it can also be used for taking phone calls, both from the native phone app, as well as Meta’s calling apps (Messenger, Instagram, and WhatApp).
Meta says the microphone is rated to handle requests at up to 30MPH/50KPH, though, I find it starts to struggle pretty heavily after about 20-22MPH (~30KPH). Again, for ‘Hey Meta’ requests specifically. However, the actual voice audio quality itself at those speeds was fine, as I show in some of my examples.
Next up, is the camera. This is placed front and center, and depending on lighting, kinda disappears into the glasses. The light is on, in the below image:

Above it is the status LED, that lets others know you’re filming. This will blink once when a photo it taken, and then will blink slowly when a video is actively being recorded. However, a ‘clever’ hardware tweak they made here is the air gaps on either side of it, which basically show your face (rather than the frame/lens). The effect here is that the status light isn’t so prominent to others, and instead somewhat fades a bit. Certainly, someone will notice the light, but it doesn’t scream “HELLLOOOOO!!!!!!”.
From a camera specs standpoint, you’ve got a 12 MP ultra-wide 122° FOV camera, which can record up to 3K (3024 x 4032 pixels) at 30FPS, or 1080p at 60FPS, or 720p at 120FPS.
When it comes to the lenses (and styles), there are currently four lenses (which are replaceable for $80), as seen below:

Meta says there’s a low-light option coming soon, but there aren’t any prescription options at this time, which will definitely be a bummer for those that need prescription lenses.
Finally, there’s the case. As noted earlier, it’s where you stick your glasses to charge, and is the only place you can put them to charge.

It’a also designed to automatically start uploads of your photos/videos once placed into the case, to the cloud via WiFi. So the rough idea being kinda similar to the GoPro cloud, in that you plug your device in, and it goes off and syncs all your content to the could, which you can then see in the Meta app own your phone.
That obviously means that your content is in Meta’s cloud platform (the owner of Facebook/Instagram/WhatsApp/etc…). There isn’t any way around this, you cannot simply plug the glasses into your computer and download the footage (partially because a bunch of the stabilization happens within the app, akin to what GoPro does on their smaller GoPro Hero 4k/4K Lit cameras).
Basic Usage:

In this section I’m going to go over a number of the basics of the glasses and app, without trying to duplicate other sections around Garmin/Strava integration, as well as the hardware.
So, starting with the app bits, there’s the Meta AI app, which is an app you’ll need to install on your smartphone to get the glasses setup/configured, as well as manage them. This is where you change settings, as well as view your gallery of photos/videos, and enable partner integrations.


Probably the most important thing you’ll do in the app initially (aside from update the firmware), is to configure WiFi of your home/etc network. This is key because when you put the glasses in the case, it’l automatically start both charging, but upload all your content to the cloud, so you can access it via the app quickly.
If you don’t do that, you can still manually connect from the app to your glasses directly via WiFi (similar to a GoPro), but, that can be a bit clunky, and means you have to keep the app open in the foreground. And I’ve found that direct connection isn’t super fast for whatever reason. Note that the device has 32GB of storage within it.

In any event, starting off on the audio side, the two key pieces here are listening to music from various providers, as well as using Meta’s AI assistant (which can answer various questions, like most other AI chatbots). Additionally, there’s the ability to do live translations, more on that in a second.
For music, you can connect the glasses to Amazon Music, Apple Music, Audible, Shazam, and Spotify. In my case, I linked it up to Spotify, and it worked super well. I just said “Hey Meta”, and then asked for whatever album/artist/etc that I wanted. It almost never got it wrong.


It would generally take about 3-5 seconds before it started playing, but then it just played as expected. You can increase/decrease volume by swipping forward/back on the side Touch Bar.
Next, there’s Live Translations. This was super cool, because it’s pretty much transparent to those around you (versus wearing headphones, which gives the impression you’re not paying attention). The other night I was at an awards ceremony/event, and given I live in Spain, a lot of it was in Spanish. I was able to simply turn on live translation and listen to the translation in English. It was slightly delayed, but generally pretty good. My Spanish friends were very impressed with it, especially watching the app also translate in real-time:


Given the speaker would repeat some of the phrases back in English, I could double-check some of the translations as well. The only downside though is that I needed to have the phone/app open, once I closed the screen, the translations stoped. 🙁
Lastly on audio bits, you can take phone calls from the glasses, in the same way you would any other headphones. This is true of both the phone’s native calling capabilities, as well as Meta apps including WhatsApp, Facebook Messenger, and Instagram. Audio quality was pretty good for both sides of the equation, audio quality for me to listen to, and the other person receiving the audio call listening to me. No issues there.


Next, there’s taking photos and videos, which is probably the key part of the Vanguard’s. To take a photo, you can simply say “Hey Meta, take a photo”, and about 1-3 seconds later, it’ll do so. Same goes for video, “Hey Meta, start capturing”.
Alternatively, you can just tap the bigger of the two buttons on the right side. Pressing it once takes a photo, and then long-holding it starts video recording. By default, it’ll record 1080p/30FPS video for 60 seconds. However, you can change this to 3K video, up to 5 minutes. The setting allows you to choose 1/3/5 minutes. You can always stop the video at any time too. There are also stabilization options too for the 1080p option.


I kept it on the 3-minute setting, after I found the 1-minute setting came a bit too fast. Sometimes I’ll remember to stop it before it gets to 3 minutes, else, it just stops automatically. It’ll make a little be-boop sound when it starts (and stops), and both are unique/different, so you can figure out which one it just did.
As for those stabilization options, frankly, I saw almost no differences. In my video up above, you can see a scenario where I ran through three different stabilization settings on a trail run, and saw virtually no difference. And the options only seem available at 1080p, not 3K. And since I saw no difference between 1080p stabilization options, or 1080p vs 3K stabilization, I just kept it at 3K across the board.
In my main video, you can also see pretty rough/chunky gravel at 50KPH, as well as various other MTB-like terrain, without any issues. It’s super impressive. Granted, they are doing most of the stabilization in post-processing. But frankly, I don’t really care, since it has to be offloaded to the app anyways, and they just do it behind the scenes.

That said, I did have a single cycling video (road cycling of all things), where their algorithms went all wonky, and then applied some sort of 10x zoom to the video, rendering it useless (though, a very solid view of the pavement for 3 minutes). But out of the piles and piles of video clips I have, that’s the only one it’s done it on.
Finally on video, there’s also the ability to do a HyperLapse (where it stitches a bunch of photos together for a moving Timelapse of sorts), as well as 120FPS (frame per second) slow-motion at…umm…720p. Which, is OK, and probably looks fine in the below example (full video in the main video above), but it still pretty low resolution compared to most action cams on the market.

On the Hyperlapse, I tried a few both cycling and driving. The cycling one was OK, though you can’t adjust the speed. Likewise, on the driving one, it seemed a bit tilty at times, not quite as good as I’d expect. And then atop that, it just wasn’t anywhere as smooth as we’ve come to expect from GoPro and others. I’d say the HyperLapse is the mode that needs the most work, out of everything on the glasses. After all, the trademark element of Hyperlapse is incredible smoothness, and this feels more like late-night drunk-but-still-happy uncle camera work. But hey [Meta], can’t win them all.
Lastly, to briefly touch on battery life. Meta claims 9 hours of battery, with the case holding an additional 36hrs of battery charge (sorta like a battery bank). It notes that you can charge from 0 to 50% in 20 minutes, which, is true, and cool. As for the 9-hours battery claim though, that seems pretty darn optimistic in my testing. Officially, here’s the claim:
“Battery life varies by use, configuration, settings and many other factors. All battery life claims are approximate and were measured using pre-production hardware based on a mixed-use scenario, which included 30 Meta AI interactions, 13 photo captures and transfers, 5 video captures (90 seconds each) and transfers, 10 minute hyperlapse, 30 minute autocatpure session, 17 messages, 30 notifications, 120 minutes of audio playback, and 5 minutes of voice calling.”
In my testing, admittedly, I would often take a bunch of photos and videos, and do so on the 3K setting with 3-minutes as the default. In doing so, I’d make it about 90 mintues through a ride or run, sometimes with music, but usually not, before the battery died. Also, with auto capture enabled. I don’t see how on earth you could possibly get the above tested specs. That said, in other activities where I toned down the quantity of videos and the resolution/duration of them, I was getting battery life that meant I could likely do a 4-5hr ride with them. Again, you really have a lot of variability into which features you use, and how that impacts battery life.
With that, let’s dive into the real goodness, sports bits!
Garmin Integration:

For Garmin device users, I’d argue the Garmin integration basically makes the Oakley glasses complete. In fact, more critically, I’d argue that it’s the fact that Meta/Oakley didn’t try and re-invent the wheel here, and just let Garmin do the heavy data-connectivity lifting.
This might sound counterintuitive at first, but having tested so many devices in the past, it’s the display that ultimately ends up annoying you. From limited field of view, to distractions, to fit issues, and more. Here, the real-time data either comes from the speaker if you ask for it, or you just look at your watch/bike computer like you always did.
This is a *critical* thing to understand, if we harken all the way back to the Recon Jet from ages ago: They failed because people still needed to wear a GPS watch or GPS bike computer for all their data needs. Adding to that, they failed because battery and component tech of yesteryear meant the size ballooned to be really heavy. By killing off a display, GPS, and other bits, the glasses just feel like…well…sunglasses.
In any case, let’s not get distracted. As for the Garmin integration. It has basically three purposes:
1) Let’s you get realtime stats during a workout from the speaker on your pace, heart rate, etc…
2) Overlay data (e.g. speed/distance/etc…) from your device onto the videos, post-workout
3) See videos from your workout in a grouped collection from the Meta AI app on your smartphone
First up, is getting it setup. This is sorta a two-parter. First, is linking the Meta AI app to your Garmin Connect account. If you’ve previously linked your Garmin account to other platforms, then you’ll find it familiar. It’s a few quick steps, and you’re good to go.


Next, you’ll need to install the Meta Connect IQ app on your Garmin device (watch/bike computer). This is the piece that holds the whole thing together. Basically, the Meta app on the watch is talking to your phone, which in turn talks to the glasses. The glasses aren’t directly talking to the watch, because the phone still needs to be involved anyway for Meta to process the voices/AI bits (remember, the glasses are basically just headphones/speaker/mic with a camera).
Meta & Garmin have the app available on a number of watches/devices. You can see the current/full list here. I assume it’ll change/expand over time, like it usually does. Roughly speaking, it’s most watches/bike computers announced in the last 4 years (since ~Jan 2022). You’ll select to agree to install it on your device, and it’ll go off and install it.


Once this is done, it’ll add the Meta data field to your activity profile. However, super interestingly, it actually offered to add it to all my activity/sport profiles, which is @#$(# awesome. If you’ve ever dealt with installing CIQ data fields before (e.g. the CORE data field), you’ll know that it’s always just installed the CIQ app to your watch, but then you have to painstakingly go into every single sport profile, add a new data page, then find the CIQ data field, add that, back out, save, blah, blah, blah. Then one day you go for a “Trail Run” instead of a “Run”, and realize it’s not on that profile, and are missing the data.
However, this time, it literally asked if I just wanted to add the data field to everything. Or, I could select which profiles I wanted. Obviously, I said “Yes, all the things!”. Heck, if I ever go scuba diving with it, I’m ready for it!
I went back to Garmin on this one, as I’ve never seen this before (and again, it’s awesome). Turns out there’s two things new here. First, the ability to add to specific activity profiles is part of CIQ API level 5.2. The second bit is the ability for a 3rd party phone app to trigger installations of a Connect IQ app directly. Meta is the first to do this, and will then be coming to other Garmin partners in Q1 2026. They noted that this will be super useful for many companies, but in particular sensor companies (such as eBike companies) that have been looking for this functionality.
Ok, geekery aside, the thing is installed, now open up that sport profile on your watch. You’ll see the Meta data field, and it’ll also say it’s connected:

As soon as you press start, it’ll then audibly tell you that “Auto Capture” is enabled, and it’ll automatically capture various moments from your activity that it deems notable. This is various splits, moments of high heart rate, and other things that nobody from either company seems to be able to confirm what exactly they are. As cool as this concept is, all it’s really seemed do is to take a bunch of random pictures at non-exciting times, filling my gallery. Like, next to parked cars on a boring suburban street.


You can disable auto capture, and I probably will after this. I think the concept has tons of potential, so maybe the two companies will figure it out. I feel like in order for it to reach ‘peak awesome’, it’d have to operate more like a TiVo, and be constantly recording, and then go back and only save the snippets that were interesting after the fact (like an impromptu sprint, or maybe a bear ran out in front of you, etc…). Of course, that’d slaughter the already limited battery, but hey, one day?
Now, when it comes to the realtime metrics, you can at any time simply ask Meta for stats. You’d literally just say “Hey Meta, what’s my heart rate?”. Or, “Hey Meta, how many miles/kilometers have I gone?” Which it always answered for me quite well. Again, perhaps this could be more compelling down the road, but most of us that have Garmin devices are pretty capable of glancing at them already. But I’m sure there’s plenty of interesting use cases here, such as accessibility.
There is also the ability to see intensity zones on the inside of the glasses, where it’ll use the color LED on the inside right side of the Vanguard’s. Now, once your workout is done, you just save your workout like normal. Nothing much changes there.
But finally, we get to my favorite part: The post-workout stats on videos (or photos). First, it’ll automatically group all your photos/videos from that ride together, since it’s imported in the completed workout file from Garmin, it knows the exact start/end times of the activity.


From there, you can choose anything from your gallery, and then select which stats you want overlaid on it.There’s a number of stats here to choose from, and for each one you can select instant or total average stats:


Sure, it doesn’t quite have all the crazy stats the good ol’ VIRB Edit app used to have (like Garmin Cycling Dynamics or such), but this is a good start. I’d encourage Meta/Garmin to lean-into this more. Have an expando option at the bottom of the list that says “Advanced” or “Geek Mode”, and then just dump a boatload of stats in there. Like, everything and anything. Become the defacto way people show all the crazy Garmin workout stats that it collects. As they say, if you’ve got it, flaunt it. Seriously, flaunt it.
Flaunting it in this realm drives cult-like adoption. For a product like the Vanguard’s, you drive mainstream adoption by first exciting the geeks. And the best way to do that is giving them all the flexibility they want to show/do interesting and unexpected things.
One trouble I ran into though, is I can’t get it to show my stats in metric (e.g. kilometers, including speed and pace). Only miles-related metrics. Meta said they do support metric, but equally, despite lots of back and forths, can’t figure out how to actually get it in metric. We’ve tried changing my region settings, changing my country settings, and plenty more – none of which has worked. They did confirm though they are working on figuring how how to make this simpler. This is definitely a Meta AI App problem, and not a Garmin one, as it’s about the presentation layer in the Meta app. It seems like somewhere, someone, way overcomplicated this by trying to deduce how you might want the data displayed, by using some maybe-workable trigger in your phone, rather than just having a simple metric/statute toggle in the settings.
In any event, once you’ve picked the stats you want, you can simply save it to your phone/gallery, or share it out to various Meta platforms, as well as Strava.


The only downside here is that you can’t trim videos within the Meta AI app. Most times, you’re just going to start the video, and it’ll auto-end in 1/3/5 minutes. Thus, I tend to have lots of extra on a video clip that I need to trim (start or beginning). I just wish there was a super-quick way to do that in the Meta AI app, so I could then go direct to Instagram/etc, without first having to edit it in my phone’s photo app/gallery.
Either way, this integration is super well done overall. This seems to be on a totally different level of integrations than I’ve ever seen Garmin do with partners in the past. Historically speaking, we’ve seen CIQ implementations that were good, but rarely amazing. And further, it always felt like Garmin did their half, but the partner either didn’t really commit to it, or, Garmin also did the partners half too. This time, it’s very clear that Meta spent the time doing their half (the Meta AI app) to a solid level, and likewise, Garmin did their half in ensuring the on-device and Connect pieces were seamless.
Strava Integration:

Next up is the Strava integration. This one isn’t as deep as the Garmin integration (notably lacking the realtime integration, as well as as many post-workout metrics), but covers the gap for folks using other devices beyond Garmin. For example, if you use an Apple Watch, Pixel Watch, Suunto, COROS, or any other device you want, then you can at least get the data from that, via Strava, for the overlays.
First up is connecting to your Strava account. If you’ve done that before for other apps, it’s basically the same here.


Next, go out and do an activity, and record it on whatever device or app you want. Meaning, record it on the Strava app, or your Suunto, or Apple Watch, or anything you want, as long as the data ends up in Strava. Of course, also critically, take some photos/video along the way with the Meta AI glasses.
Next, open up the gallery and choose that particular clip. You’ll then see the ‘Share’ option at the bottom. From there, choose ‘Strava’. When you do so, it’ll open up an option to choose which workout file you want to use (in my case, I have plenty of concurrent devices to choose from)


In addition, you can overlay stats on them as well, though, I found at times they were a bit more limited selection than with the Garmin stats. Nonetheless, this works fine, though, it’s not quite as streamlined as the Garmin integration, which clearly is pre-populating the workout data behind the scenes before you get around to manually selecting the data. Not a huge deal, but some workflow differences.
Apple Health Integration:


I just want to super quickly note that in addition to Garmin & Strava integration, there’s also roughly the same level of integration as Strava, but for data coming from Apple Health. This can include Apple Watch workouts, as well as other watches/devices that stick data into Apple Health.
I only tried it briefly, but because I already had the Garmin integration, it seems to always prefer to pull data from the Garmin device on a given workout, rather than the Apple Watch (which was also recording). But, the option is there, so I did want to make sure folks knew about it.
Wrap-Up:

In a world where pushing out half-baked products seems to becoming the norm, it’s rare to get a product that not only works well, but actually makes me want to use it after I review it. This is the seemingly rare exception of one that largely works as advertised, and even exceeded my expectations repeatedly.
So much so I’ve already ordered my own pair with my own money to keep using as my defacto sunglasses for sports and outdoor life. I just love the flexibility of it, and the ease of use of getting the footage to Instagram and other social media tidbits. Or, just sharing that picture of the goat cutting me off again on my ride, with my wife. All hands-free.
Sure, there’s plenty of little things I’d love to see changed. But critically, none of them are showstoppers for me. Nice to haves, not need to haves.
After more than a decade of trying smart glasses, we finally have one that doesn’t suck. I have one that I actually want to use, and actually have a use case for beyond finishing the review. And while it’d be easy to dismiss all the attempts before it, the reality is that all of those devices had to exist, to fail, to learn from, to figure out what works. And then hopefully from here, Meta, Oakley, and others (competitors and partners) can advance the idea further yet again.
Until then, I’m pretty darn happy.
With that, thanks for reading!
Found This Post Useful? Support The Site!
Hopefully you found this review/post useful. At the end of the day, I’m an athlete just like you looking for the most detail possible on a new purchase – so my review is written from the standpoint of how I used the device. The reviews generally take a lot of hours to put together, so it’s a fair bit of work (and labor of love). As you probably noticed by looking below, I also take time to answer all the questions posted in the comments – and there’s quite a bit of detail in there as well.
If you’re shopping for the Oakley Meta Vanguard Smart Glasses or any other accessory items, please consider using the affiliate links below! As an Amazon Associate I earn from qualifying purchases. It doesn’t cost you anything extra, but your purchases help support this website a lot.
And of course – you can always sign-up to be a DCR Supporter! That gets you an ad-free DCR, access to the DCR Quarantine Corner video series packed with behind the scenes tidbits…and it also makes you awesome. And being awesome is what it’s all about!
Thanks for reading! And as always, feel free to post comments or questions in the comments section below, I’ll be happy to try and answer them as quickly as possible. And lastly, if you felt this review was useful – I always appreciate feedback in the comments below. Thanks!
First Appeared on
Source link

